In remote or underserved areas, reliable communication can be a challenge due to limited internet access or infrastructure. This project outlines how to create a small-scale, decentralized communication network using Raspberry Pi 5 boards equipped with LoRa (Long Range) modules. The network is designed to support 50-100 users in a small populated place, such as a village, enabling text-based messaging, data sharing, and basic alerts without relying on cellular or Wi-Fi networks.
To add intelligence, we'll integrate AI capabilities on the Raspberry Pi 5 using lightweight models like TensorFlow Lite. The AI can handle tasks such as automated message routing, sentiment analysis for community alerts (e.g., detecting urgent messages), or even simple natural language processing (NLP) for chat moderation. LoRa's low-power, long-range capabilities (up to several kilometers in open areas) make it ideal for mesh networking, where devices relay messages to extend coverage.
This setup assumes a mesh topology, where each user's device acts as a node, relaying data to others. For 50-100 users, you'll need multiple nodes, but we'll focus on building a single node prototype that can be replicated.
Key Benefits:
- Low cost: Each node costs around $100-150.
- Energy efficient: Suitable for solar-powered setups in off-grid areas.
- Privacy-focused: Decentralized, no central server required.
- Scalable: Easily expand by adding more nodes.
Estimated Range and Capacity:
- LoRa can cover 2-10 km per hop depending on terrain and antenna.
- For 50-100 users, aim for 10-20 gateway nodes to handle traffic, with users connecting via simple LoRa-enabled devices (e.g., smartphones with LoRa adapters or dedicated handhelds).
Required Components
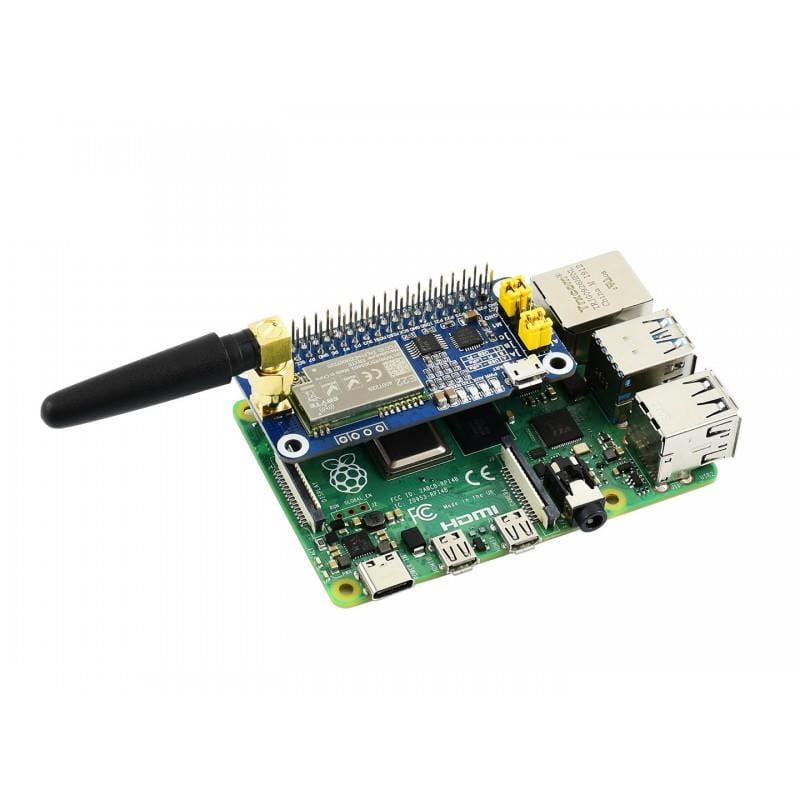
For a single node (Raspberry Pi 5 as a gateway/router):
- Raspberry Pi 5 (4GB or 8GB model recommended for AI tasks).
- LoRa module: SX1276/SX1278-based HAT or breakout board (e.g., Dragino LoRa HAT or Waveshare SX1262).
- Antenna: High-gain outdoor antenna (5-9 dBi) for better range.
- Power supply: 5V/3A USB-C adapter; consider solar panels for remote deployment.
- Storage: 16GB+ microSD card with Raspberry Pi OS (Lite version for efficiency).
- Display/Keyboard (optional for setup): HDMI monitor and USB peripherals.
- Enclosure: Weatherproof case for outdoor use.
- Additional for AI: USB accelerator like Coral TPU (optional for faster inference).
For user endpoints (simpler nodes):
- ESP32 or Arduino boards with LoRa modules (cheaper alternatives to full Pi setups for end-users).
- Mobile app integration: Use Bluetooth to connect smartphones to LoRa nodes.
Total cost per gateway node: ~$120. Scale up by distributing simpler nodes to users.
Step-by-Step Instructions
Step 1: Hardware Assembly
1. Set up the Raspberry Pi 5:
- Insert the microSD card with Raspberry Pi OS installed (download from raspberrypi.com and flash using Raspberry Pi Imager).
- Connect the LoRa HAT/module to the Pi's GPIO pins. For Dragino HAT, align pins and secure.
- Attach the antenna to the LoRa module's connector.
- Power on the Pi and boot into the OS.
2. Test Connections:
- SSH into the Pi (enable SSH in raspi-config).
- Verify LoRa module: Run `ls /dev` to check for `/dev/spidev0.0` (SPI interface).
Step 2: Software Installation
1. Update System:
```
sudo apt update && sudo apt upgrade -y
sudo apt install python3-pip git -y
```
2. Install LoRa Libraries:
- Use PyLoRa or LoRaWAN libraries. Clone a mesh networking library like Meshtastic (which supports LoRa for chat networks).
```
git clone https://github.com/meshtastic/Meshtastic-python.git
cd Meshtastic-python
pip3 install -r requirements.txt
```
- Alternatively, for custom setup: Install `RPi.GPIO` and `spidev`.
```
pip3 install RPi.GPIO spidev
```
3. Install AI Frameworks:
- TensorFlow Lite for edge AI:
```
sudo apt install libatlas-base-dev -y
pip3 install tensorflow-lite
```
- For NLP/sentiment analysis, add Hugging Face's Transformers (lite version):
```
pip3 install transformers torch
```
- Download a pre-trained model, e.g., DistilBERT for sentiment:
```
from transformers import pipeline
classifier = pipeline('sentiment-analysis')
```
Step 3: Configure LoRa Mesh Network
1. Set Up LoRa Parameters:
- Frequency: Use 433MHz, 868MHz, or 915MHz based on your region's regulations (check local laws).
- In code, configure spreading factor (SF7-SF12) for range vs. speed trade-off. Higher SF for longer range but slower data.
- Example Python script for basic send/receive:
```python
import time
import LoRa # Assuming PyLoRa library
lora = LoRa.LoRa(verbose=False)
lora.set_mode(LoRa.MODE.STDBY)
lora.set_freq(915.0) # Adjust frequency
lora.set_spreading_factor(7)
# Send message
lora.write_payload([ord(c) for c in "Hello LoRa!"])
lora.set_mode(LoRa.MODE.TX)
time.sleep(1)
# Receive loop
while True:
if lora.received_packet():
payload = lora.read_payload()
print("".join(chr(b) for b in payload))
```
2. Implement Mesh Topology:
- Use libraries like PainlessMesh or adapt Meshtastic for LoRa.
- Each node broadcasts its ID and relays messages if not the destination.
- For 50-100 users: Limit hops to 3-5 to avoid latency. Use channel hopping to reduce interference.
3. Integrate AI:
- Message Routing with AI: Use a simple ML model to predict optimal routes based on signal strength history.
- Collect data: Log RSSI (Received Signal Strength Indicator) from LoRa packets.
- Train a basic model (e.g., scikit-learn on Pi):
```
pip3 install scikit-learn
```
Example: Linear regression for path prediction.
- Sentiment Analysis for Alerts: Analyze incoming messages.
```python
from transformers import pipeline
classifier = pipeline('sentiment-analysis', model='distilbert-base-uncased-finetuned-sst-2-english')
def analyze_message(msg):
result = classifier(msg)[0]
if result['label'] == 'NEGATIVE' and result['score'] > 0.8:
return "Alert: Potential emergency!"
return "Normal message"
# Integrate into receive loop
msg = "".join(chr(b) for b in payload)
print(analyze_message(msg))
```
- NLP for Moderation: Filter spam or translate messages using lightweight models.
- Run AI on boot: Use systemd service to start scripts.
### Step 4: User Interface and Deployment
1. Build a Simple App:
- Web-based UI: Use Flask on Pi.
```
pip3 install flask
```
Create a dashboard for sending/receiving messages.
- Mobile Integration: Pair with Bluetooth for smartphone access (use BlueZ on Pi).
- For end-users: Distribute ESP32-LoRa kits with a simple LCD/button interface.
2. Network Deployment:
- Place gateway Pis on high points (roofs, hills) for coverage.
- Test range: Start with 2-3 nodes, send messages, measure latency.
- Scale: Assign unique IDs to users. Use encryption (e.g., AES via pycryptodome) for privacy.
- Power Management: Enable sleep modes on LoRa for battery life.
3. Testing and Optimization:
- Simulate 50-100 users: Use multiple virtual nodes or scripts to flood messages.
- Monitor with AI: Implement anomaly detection to flag network issues.
- Bandwidth: LoRa is low-data ( ~0.3-50 kbps), so limit to text/short data.
Challenges and Considerations
- Regulatory Compliance: Ensure LoRa frequency use is legal in your area (e.g., FCC in US, ETSI in Europe).
- Security:Add authentication to prevent unauthorized access.
- Scalability Limits: For >100 users, consider hybrid with Wi-Fi gateways.
- AI Performance: Raspberry Pi 5's NPU helps, but heavy models may need optimization or offloading.
- Maintenance:Remote SSH for updates; use Watchdog for reliability.
Conclusion
This AI-enhanced LoRa mesh network on Raspberry Pi 5 empowers small communities with resilient communication. By following these steps, you can prototype a node in a weekend and deploy a full network in weeks. Experiment, iterate, and share your improvements—open-source the code on GitHub for community benefit!